Notes for presentation 1
Qi Li, Bohua Cao, Maryam Mohseni
Topic: HTTP proxying with Burp Suite
[toc]
Part 1: Introduction(Maryam Mohseni)
Burp Suite is one of the best hacking tools which consists of a group of tools that are used for web security analysis as well as discovering vulnerability in web applications. Web security covers a wide aspect of knowledge, including SQL injection, password breach, CSRF, XSS, ETC. In the next section, we’ll focus on performing a traffic interception through Burp Proxy which is a user-driven workflow in more detail.
The official website is: https://portswigger.net/burp/communitydownload
Part 2: What does it do?
A list of tools and their explanation in Burp Suite1:
- Target - This tool contains detailed information about your target applications, and lets you drive the process of testing for vulnerabilities.
- Proxy - This is an intercepting web proxy that operates as a man-in-the-middle between the end browser and the target web application. It lets you intercept, inspect and modify the raw traffic passing in both directions.
- Scanner Professional - This is an advanced web vulnerability scanner, which can automatically crawl content and audit for numerous types of vulnerabilities.
- Intruder - This is a powerful tool for carrying out automated customized attacks against web applications. It is highly configurable and can be used to perform a wide range of tasks to make your testing faster and more effective.
- Repeater - This is a tool for manually manipulating and reissuing individual HTTP requests, and analyzing the application’s responses.
- Sequencer - This is a sophisticated tool for analyzing the quality of randomness in an application’s session tokens or other important data items that are intended to be unpredictable.
- Decoder - This is a useful tool for performing manual or intelligent decoding and encoding of application data.
- Comparer - This is a handy utility for performing a visual “diff” between any two items of data, such as pairs of similar HTTP messages.
- Extender - This lets you load Burp extensions, to extend Burp’s functionality using your own or third-party code.
- Clickbandit - This is a tool for generating Clickjacking attacks.
- Collaborator client Professional - This is a tool for making use of Burp Collaborator during manual testing.
- Mobile Assistant - This is a tool to facilitate testing of mobile apps with Burp Suite.
Those are the tools inside Burp Suite, some of them are only for professional version.
If you need more material, please check https://portswigger.net/burp/documentation/desktop/tools
Part 3: demonstration 1(Qi Li)
3.1 HTTP GET/POST request capture
The first step is open Burp Suite. I’m using Kali Linux VM, so it’s preinstalled.

After opening it, go to the proxy tab and open the integrated broswer:
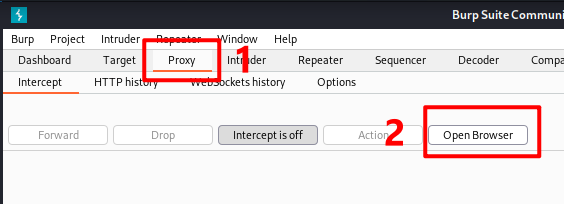
Type youtube.com and enter, your window will redirect to burp suite.
Click forward to forward the request to google’s server.
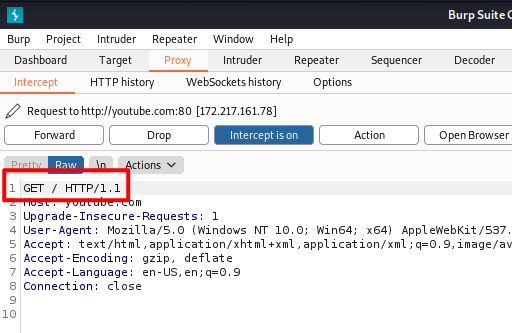
All the assets are loaded through get request.
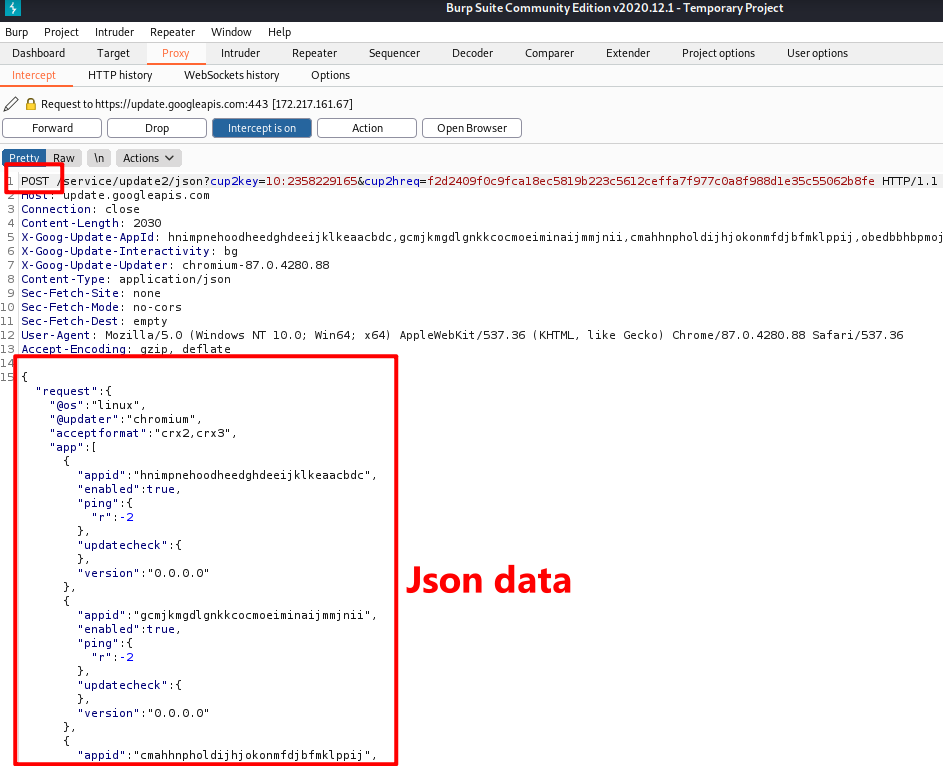
The api request are sent through post request.
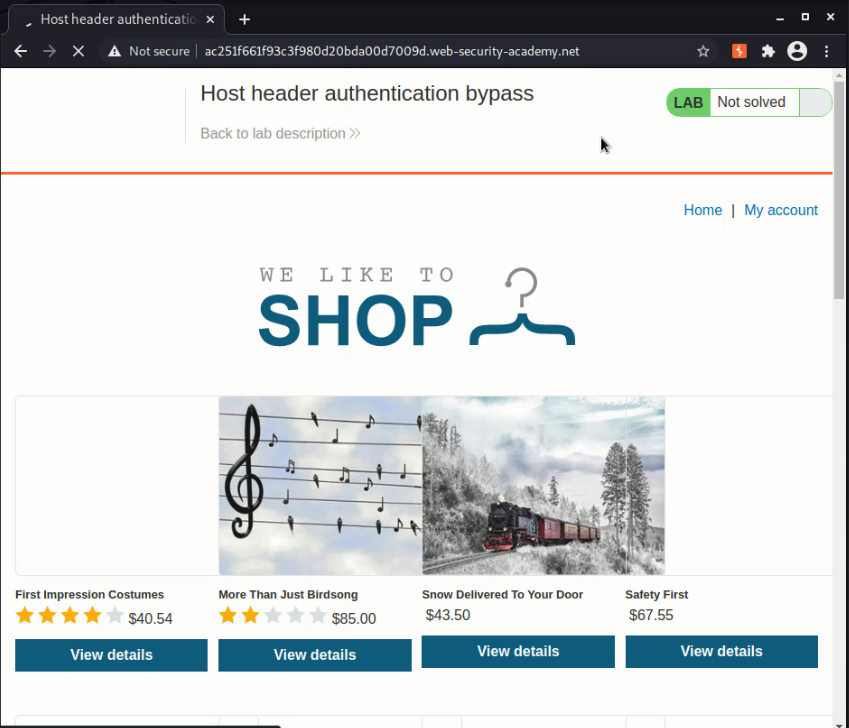
3.2 Host header authentication bypass
Now, we know how to capture request even under https protocol. It’s time for a real hacking mock through Web Security Academy on PortSwigger (https://portswigger.net/web-security/dashboard).
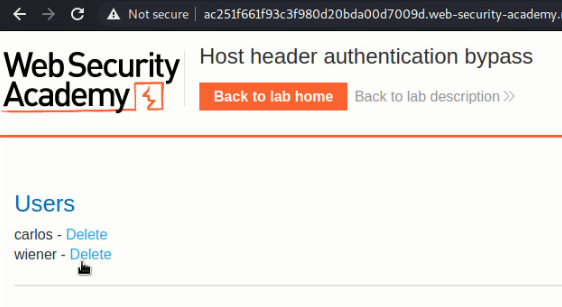
For the first mock, we need to access the admin panel and delete Carlos’s account.
open the lab url and try to find admin panel. Since website often has a robots.txt to tell search engine what not to index, so we might find the admin url in the robot file.
checking the robot file.
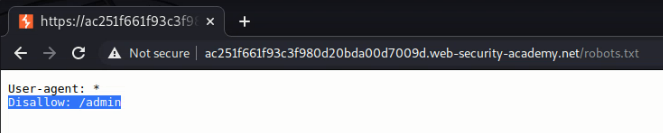
We see that the website disallow spiders to crawl /admin , the management panel. Now, we open the admin panel in burp suite browser.
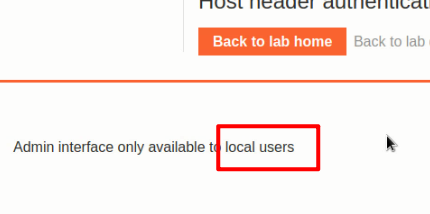
But it only allows local user to login, so I sent this get request to Repeater and modify the host:
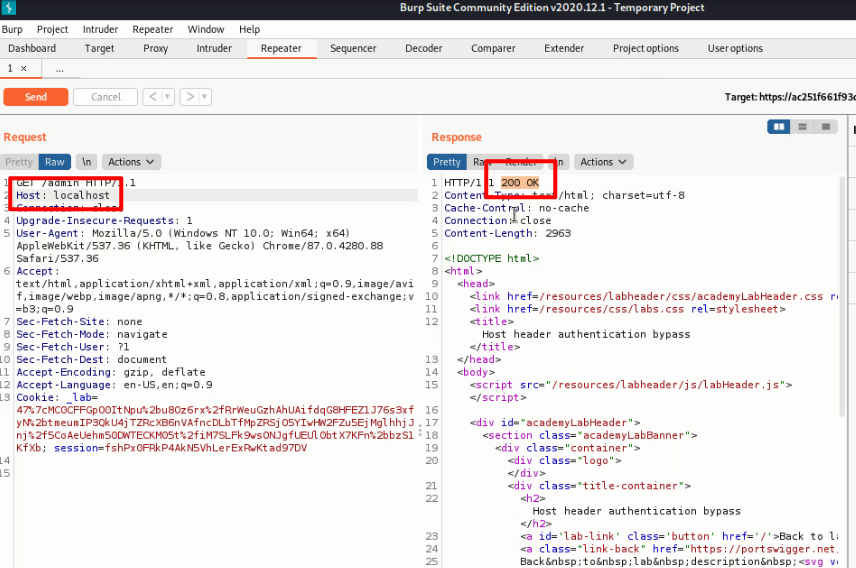
And 200 ok return means we can open admin page by changing the host. And the final step is to delete the user:
3.3 Authentication bypass via OAuth implicit flow
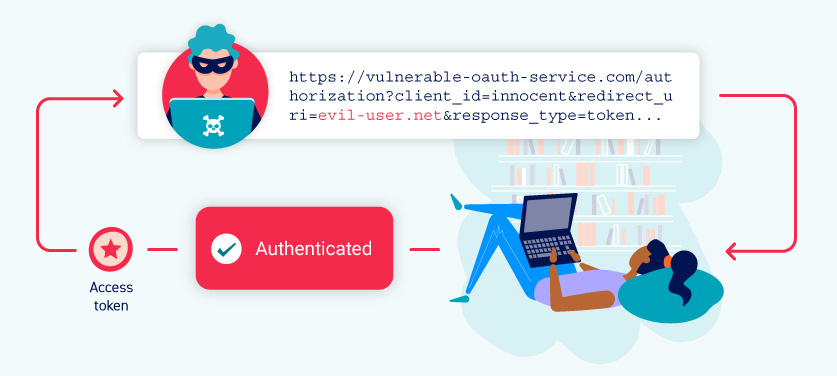
How does OAuth work2?
There are numerous different ways that the actual OAuth process can be implemented. These are known as OAuth “flows” or “grant types”. In this topic, we’ll focus on the “authorization code” and “implicit” grant types as these are by far the most common. Broadly speaking, both of these grant types involve the following stages:
- The client application requests access to a subset of the user’s data, specifying which grant type they want to use and what kind of access they want.
- The user is prompted to log in to the OAuth service and explicitly give their consent for the requested access.
- The client application receives a unique access token that proves they have permission from the user to access the requested data. Exactly how this happens varies significantly depending on the grant type.
- The client application uses this access token to make API calls fetching the relevant data from the resource server.
In this test, here’s what we need to do:
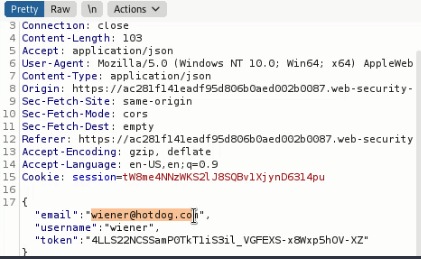
log in to Carlos’s account. His email address is carlos@carlos-montoya.net.
You can log in with your own social media account using the following credentials: wiener:peter.
The steps are mostly the same with the first mock test, the only difference is to modify the post request’s data area:
Full steps will be in this video I recorded, please refer to this video:
https://d.pq02.com/presentation1.mp4
And the lab I used:
https://portswigger.net/web-security/oauth/lab-oauth-authentication-bypass-via-oauth-implicit-flow
https://portswigger.net/web-security/host-header/exploiting/lab-host-header-authentication-bypass
Part 4: demonstration 2(Bohua Cao)
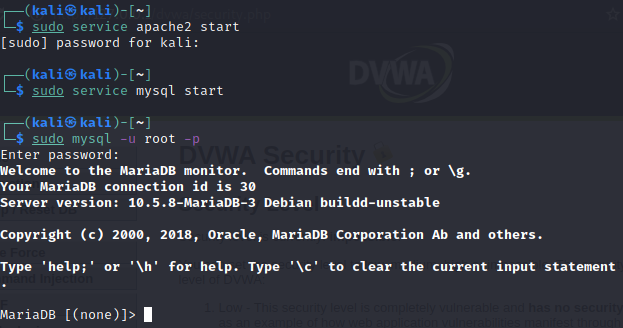
4.1 DVWA set up
Since I’ve already set up the DVWA, all I need to do is start apache service and mysql.
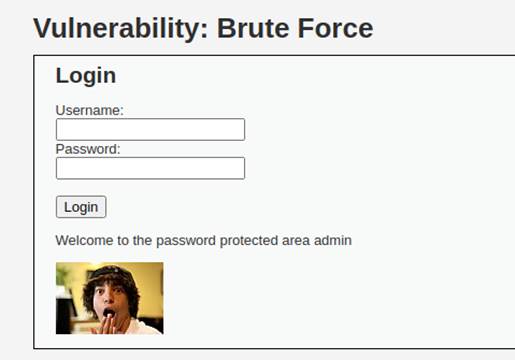
4.2 DVWA Brute force (security level low)
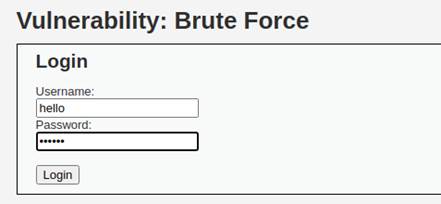
First, lets login the DVWA through default username “admin” and password “password”.
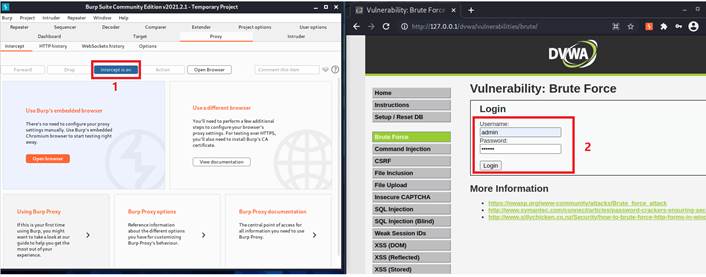
Then, starting by setting the DVWA security to low and click the Brute Force module.

Now, let’s turn on the interception for package grabing and enter the correct username and some random password, then press login.
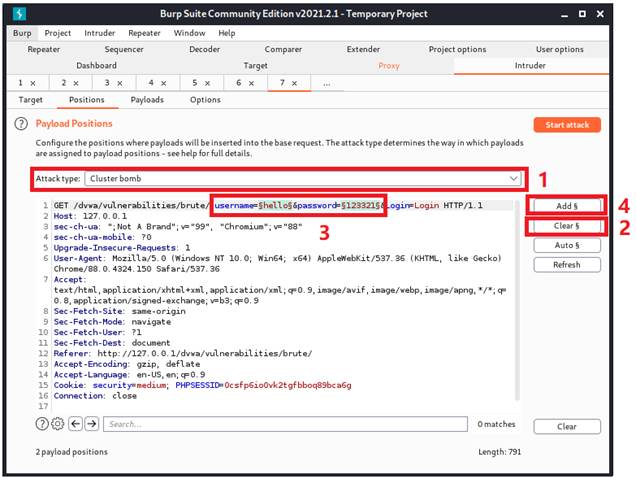
We can see the catched data, let’s send it to intruder.
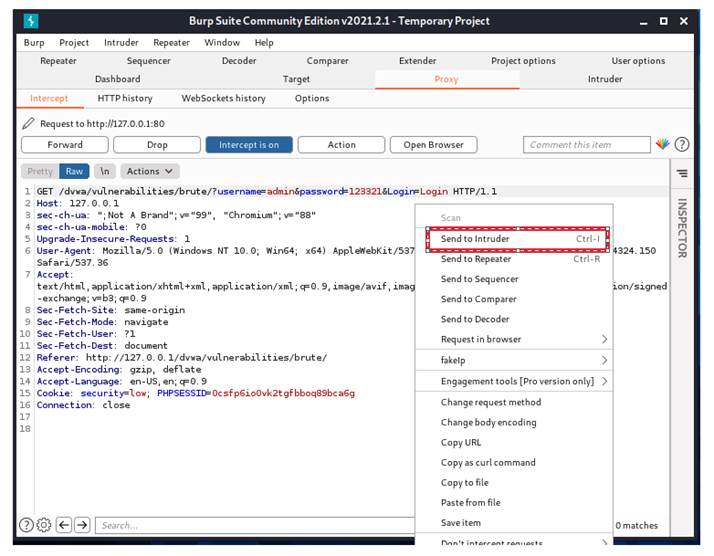
After we sending the package to intruder, you can see the color of buttom “Intruder”changes to orange, which means it is ready for work. let’s click it.

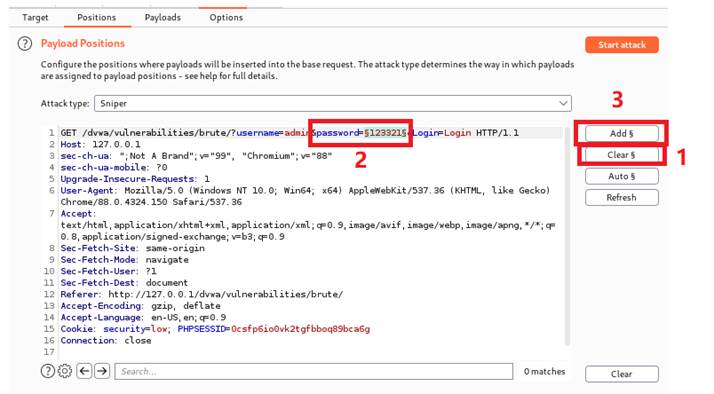
There are four settings in intruder module, target is set automatically to 127.0.0.1:80, which is the address of DVWA.

Under position option, we will add the variable which we want to brute force attack. We can notice that the default attack type is “Sniper”. It is used to brute force attack single variable, which is exactly what we need in this case. Therefore, we clear all chosen variables, then we circle out our input password under password field and add it.
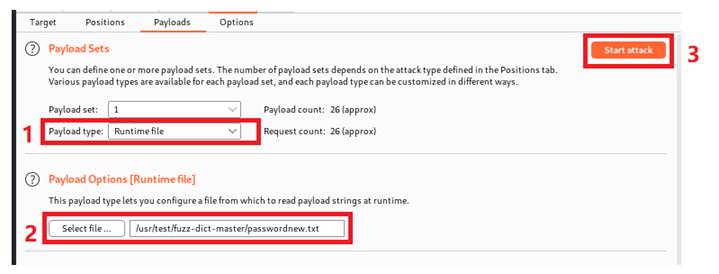
Under payloads option, we are able to decide which type and content of payloads we are going to use. I downloaded a txt file that contains more than ten thoughsand common passwords, for test purpose, I diminished the size to 50. We can load the file here by setting the payload type to runtime file and select our password file under payload options option.
At this moment, we are ready to perform a brute force attack against DVWA. We can click start attack now.
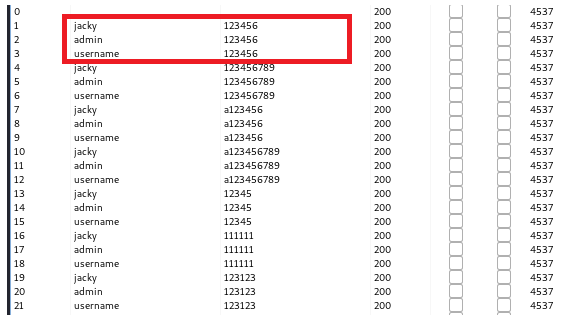
After it finishes attacking, we can click the header “length” to see if there is any row that contains special package length.
We can see that there are tow packages that have the special length of 4571. Regardless of the package 0, we click the package 11 and check the response. We can render the website to explicitly check what is going on.
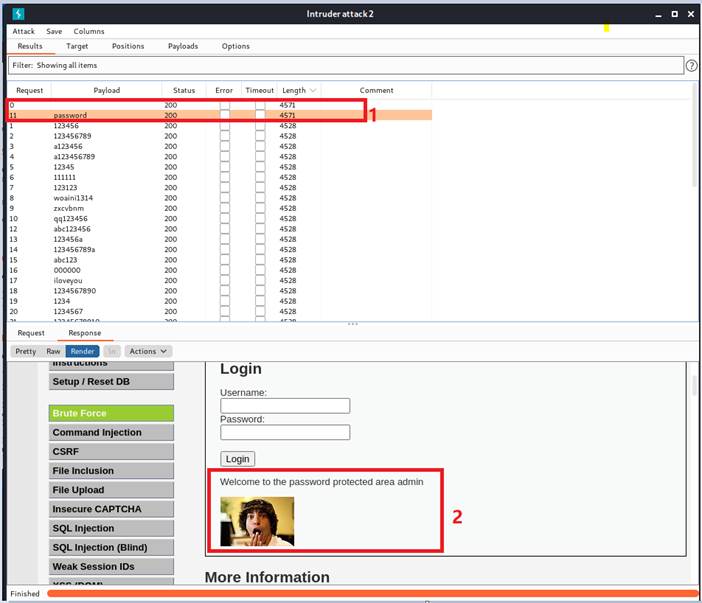
We can see that the package 11 works. Now we can turn off the interception and try password “password” to verify if we got the correct password.

It worked.
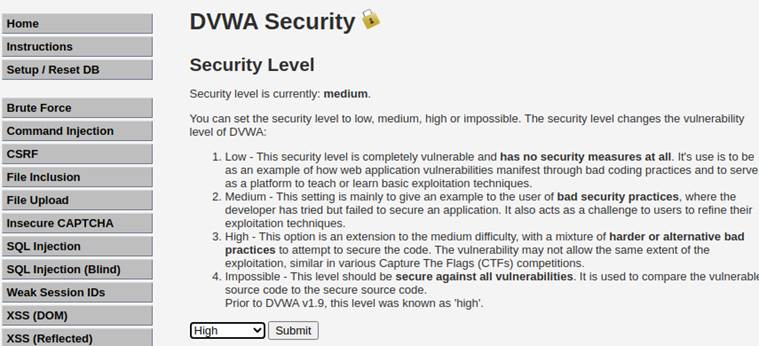
4.3 DVWA Brute force (security level medium)
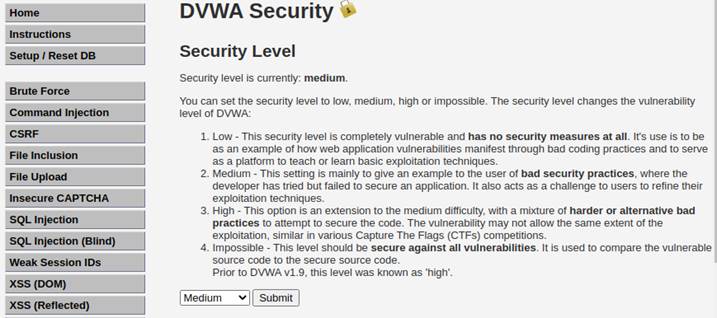
First we set the security level to medium.
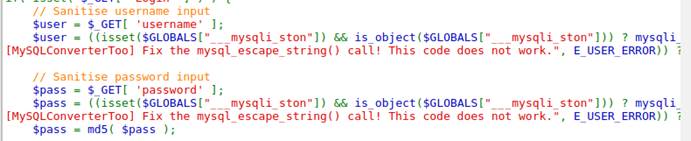
Since the DVWA provides source code, we are going to take a quick look at source code and compare it at this time. We can notice that compare to the low level, the code for medium only add a procedure of sanitising username input and password input.
 Since it will not limit the time of attempting, we can use the same strategy which we used in low security level regardless of sanitising. However, we are going to test brute force attacking both username and password.
We pretend that we know neither username nor password. So, we will enter some random username and password and intercept the package through burpsuite.
As what we did in low security level, we grab the package and send to intruder. For multiple variables, we are going to pick the attack type of “cluster bomb”, clear all the chosen variables and add our input under username and password fields.
Since we are going to brute force attack both username and password and pick the pitchfork mode, we are going to load 2 payload sets. One for username and one for password. According to the last figure, since username is prior to the password, we will load username in payload set 1 and load password in payload set 2.

It will be slower because the cluster bomb will recursively test all passwords for all usernames.
Again, we click the header “length” and we noticed there is a package with special length 4580.
We can render the response of this package. We’ll notice that we successfully login to the protected area.
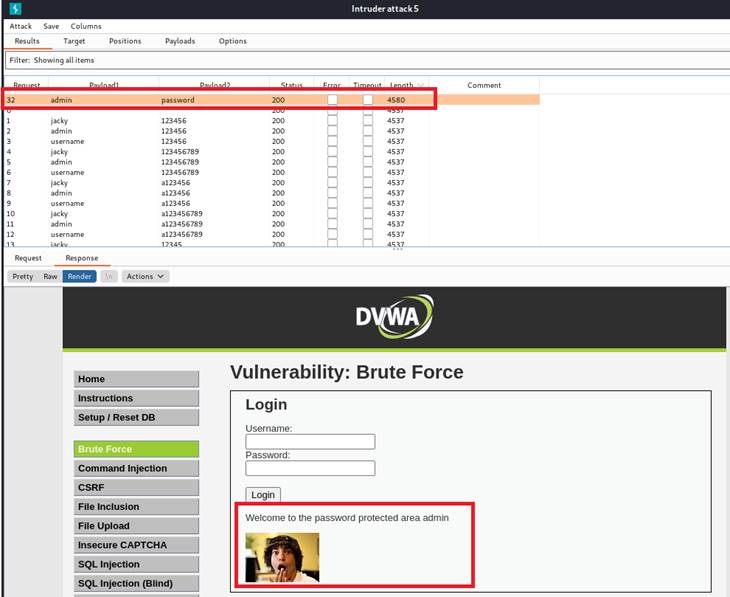
Then, we turn off the interception and verify it. It worked.
4.4 DVWA Brute force (security level high)
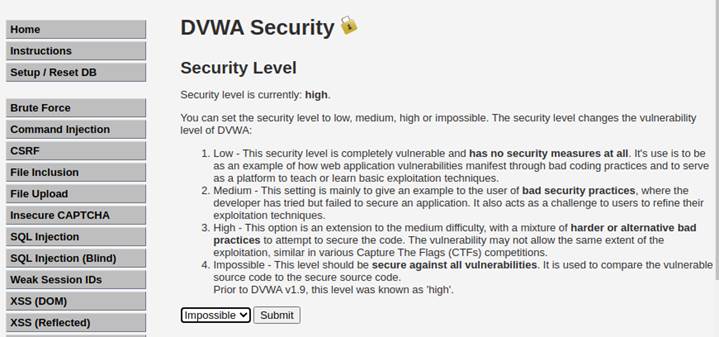
Now, let’s set the security level to high.
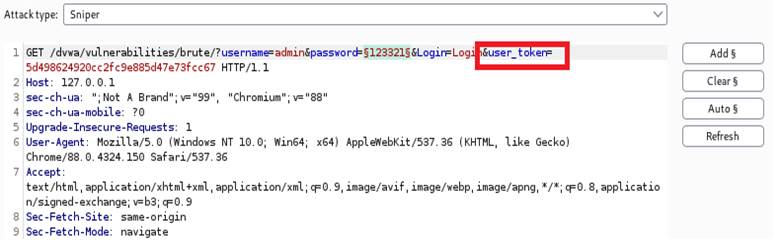
From the source code, we can notice that it adds the user-token for preventing the brute force attack. Since it does not limit how many time that user enters wrong password, brute force attack may work again.

Therefore, we are going to try what we did before to see what’s happening. Again, we will assume that we know the username “admin”, but we don’t know the password. We’ll repeat what we did in low security level.
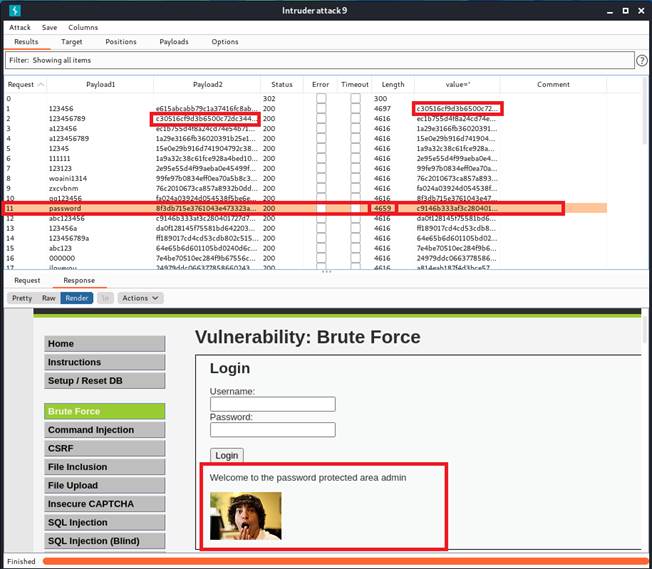
We can notice that except of username and password, there is one more filed “user_token”.
This time, we can see that except of the first packge, none of packapge has special length, include the package with correct password.
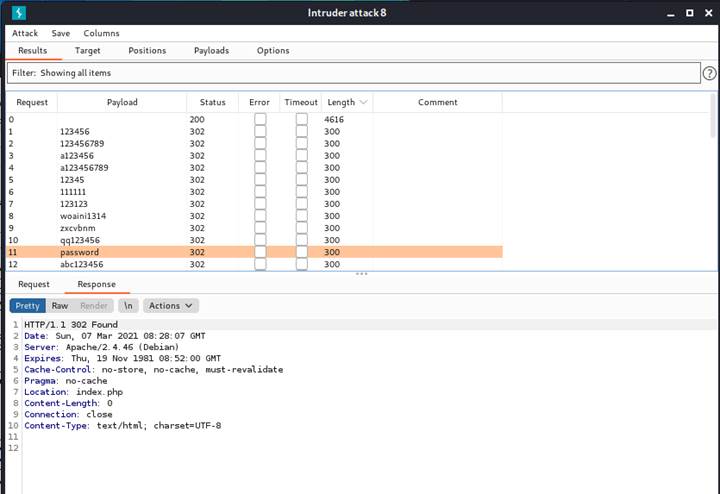
The status code 302 indicates that those requests are redirected for some reason. It is due to that even though we are using the different password, we are using the same user-token.


Therefore, our requests will be rejected because the user-token they are using is expired. To solve this problem, we need to use the combination of recursive grep function and extract grep function. From the response of the first attack, they can extract the text in the user specified field. If we can extract the user-token and constantly modify it for the next request, it will not be expired.
We will choose pitchfork mode and add both password filed and user_token field as variables this time. It will map each password and user_token variable and keep changing them to perform the brute force attack.
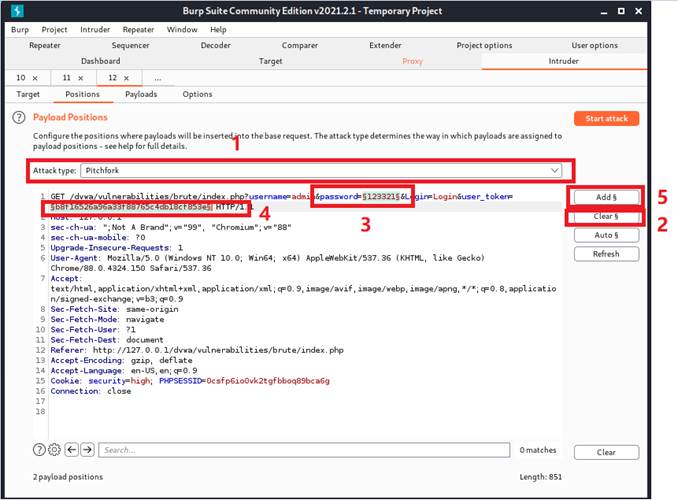
Then, we are going to extract the grep that we are interested in.
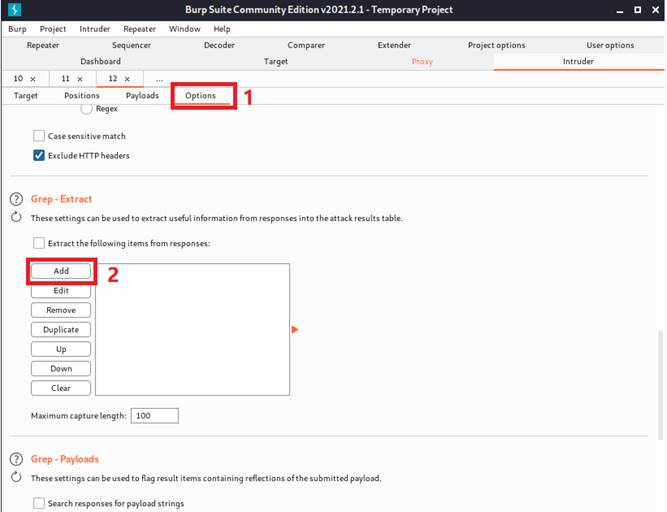
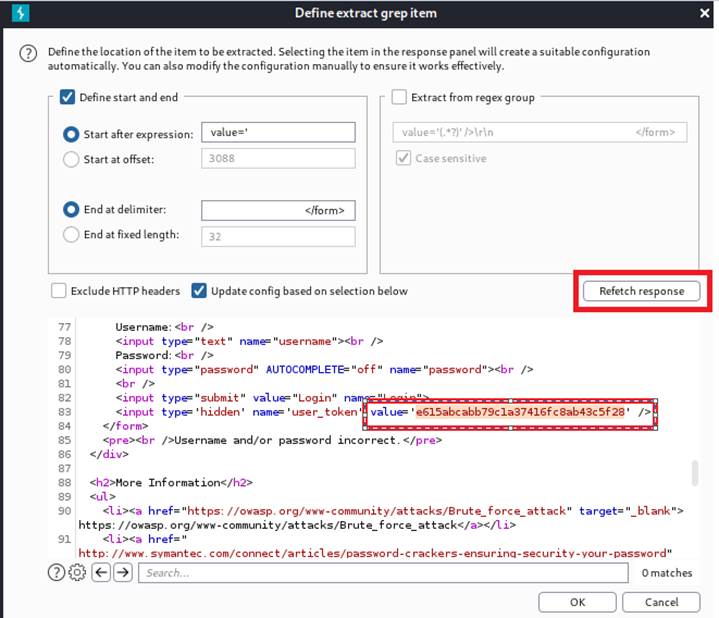
We will fetch the response and select the value under user_token field. In addition to that, we will also copy the value.
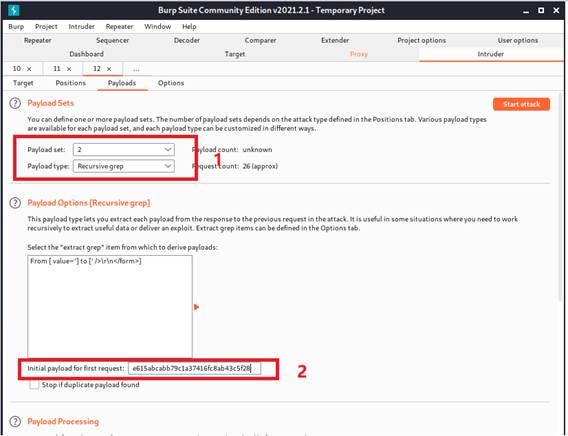
Next, we are back to the “Payloads” option and set up the payloads. Payload 1 is the runtime file contains a list of passwords. Payload 2 is going to be recursive grep. Moreover, we will paste the user_token value of the first request as the initial payload.
Now, we are ready for performing a brute force attack.
As the last figure shows, it extracts the user-token use it in header for the next requests. Through this method, we get the correct password successfully.
4.5 DVWA Brute force (security level impossible)
Now, it is time to attack the security level impossible.
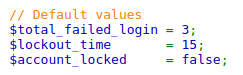
According to the source code, it adds a field “total_failed_login”, which means it will block you if you exceed total failed login.
Let’s try what we did in last security level to see what will happen. First, I notice that instead of a GET data, we get the POST data this time.

The account is locked after the “total_failed_login” is reached. It won’t work although the password is correct and the user-token is constantly modified.
In the beginning, I thought my IP is banned. Therefore, if I can request via a random IP every time, I may be able to access the account.
Follow the trains of thought, I downloaded the fakeIP extension and tried to generate random IP every time it requests.
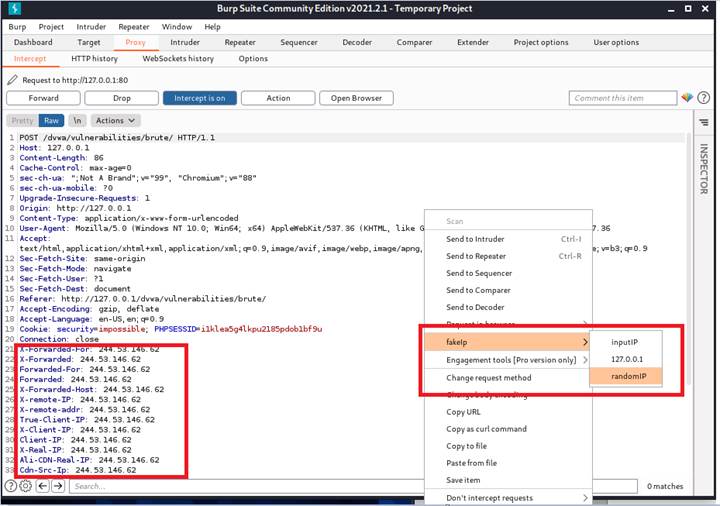
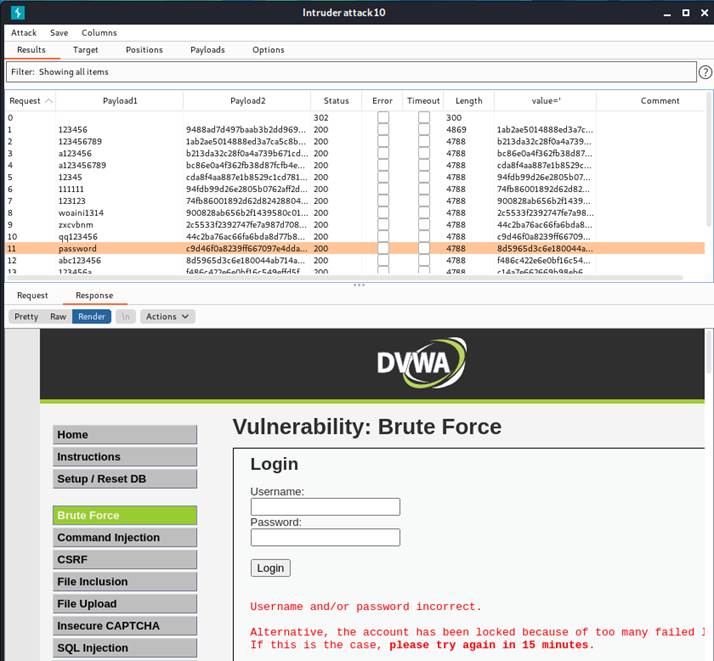
There will be three variables this time, they are X-Forwarded-For, password, and user-token.
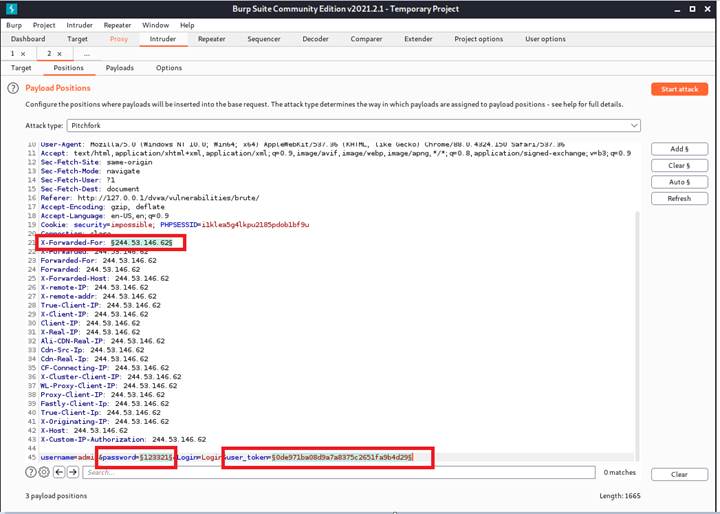
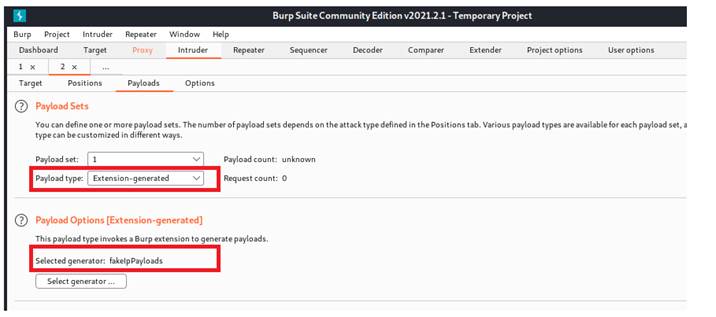
Therefore, according to the order, the first payload will be the extension-generated, and the generator is chosen to be fakeIpPayloads. The second payload is password and the third one is the user_token.
After properly construct the payloads, we are ready for attacking.
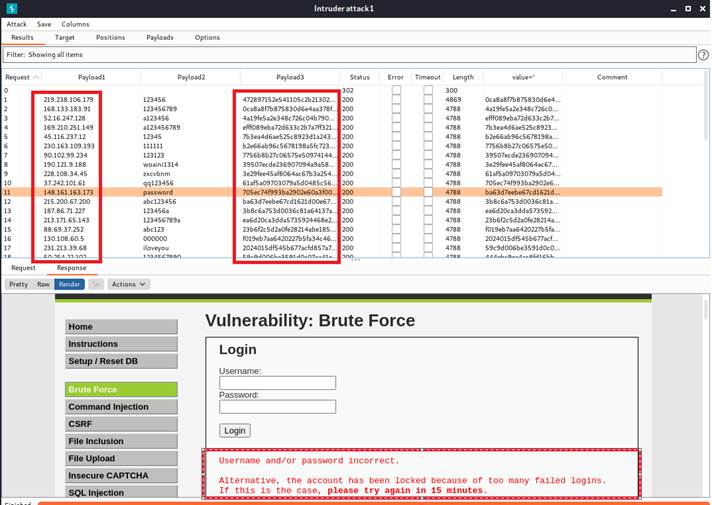
We can notice that although the IP address and the user-token is constantly changing, our account is still locked. Therefore, brute force attack may not work in this security level. To solve this problem, we might need to combine burp suite with another tool. However, I will leave it for the future because I believe it will take a lot of time to solve.
Part 5: Summary(Maryam Mohseni)
To conclude, we elaborated basic usage of Burp suite and some of its various tools. Also, a traffic interception was performed by Burp Suite proxy. After we captured request, we performed a real hacking mock through web security Academy on portSwigger in order to manifest host header authentication bypass. Then, authentication bypass was expressed.